
 Our mission is to lead innovation by providing the most advanced solutions in reliability and sustainability to empower…
 REC is looking to the future by aligning business goals with Saudi Arabia’s 2030 Vision. Part of this is investing in our young people and their future.
 Reliability Expert Center was established with the strategic vision of spreading a reliability and sustainability culture across Saudi Arabia.


Download Example File for Version 10 (*.rsgz10) or Version 9 (*.rsr9)
This example demonstrates two features in Lambda Predict that you can use to perform “what-if” analyses for comparison purposes. For example, you may wish to change one property (such as temperature, environment, etc.) to see what impact it will have on the predicted failure rate. You may also want to see how using redundancy affects the predicted failure rate.
The example file contains sample system configuration data for all prediction standards supported by Lambda Predict. You can open any of the sample projects, but only the systems that are analyzed with the prediction standard you have purchased will be displayed. To demonstrate the tools, we will use the MIL-217 system as an example. The instructions are generally the same for all prediction standards (unless noted otherwise), so you can follow along with the example regardless of which standard is available to you.
Note: The properties described in this section do not apply to systems analyzed with the FIDES standard.
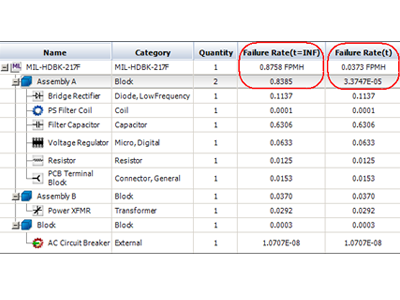
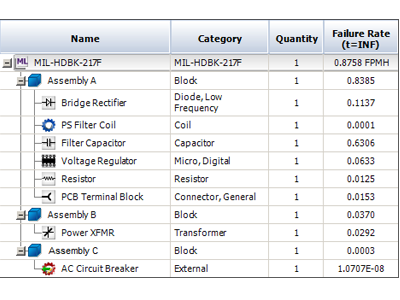
Assume that you have a system that consists of three subassemblies: A, B and C. As an example, the following picture shows the MIL-217 system in the sample project.
We will evaluate how increasing the ambient temperature of Assembly A affects its failure rate and the failure rate of the overall system.
Step 1: Create a duplicate of the system so you can perform a comparison. To do this, select the top-level item, and then copy and paste it at the same level as the existing system (you can use the standard keyboard shortcuts CTRL+C and CTRL+V). Rename the duplicate to Test Version.
Step 2: The ambient temperature property of all the components in Assembly A is currently set to 30 degrees. To increase the ambient temperature of the entire assembly, we would need to edit that property in each individual component. An easy way to do this is to use the block’s Update Modes properties.
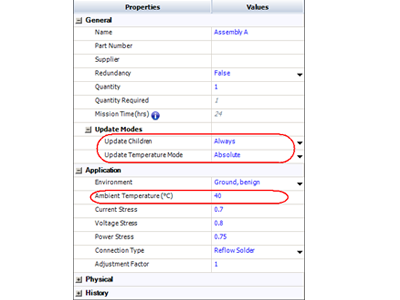
Press Enter or click outside the field to apply the change to all components in the block that have that property. (Components that do not have the Ambient Temperature property are not affected.)
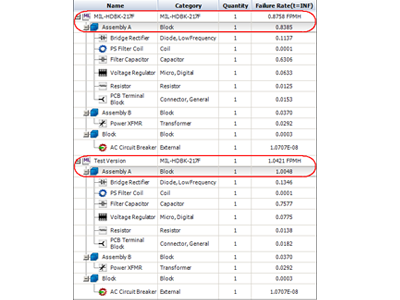
The following picture shows how the change in the ambient temperature has affected Assembly A. The increase in temperature results in a much higher failure rate for the assembly. This in turn causes an increase in the failure rate of the overall system.
Lambda Predict makes it easy to explore whether you can meet your MTBF or failure rate target by adding redundancy. In this next example, we will evaluate how using two identical assemblies in a reliability-wise parallel configuration affects the failure rate of the overall system.
Step 1: Before starting the analysis, we must configure the system hierarchy to display results from redundancy calculations. Right-click anywhere in the system hierarchy and then choose Customize Columns on the shortcut menu. In the window that appears, select the Failure Rate(t) check box and then click OK to display the column in the system hierarchy.
Step 2: Return to the prediction folio. Select Assembly A and then make the following changes to the block’s properties:
Step 3: Select the top-level item in the system hierarchy and set its Mission Time field to 24 hours. This will be the time at which the failure rate will be calculated. This time must be the same for all redundancy calculations in the same prediction; therefore, it can only be specified for the top-level item. Press Enter or click outside the field to accept the change and recalculate the results.